Enhancing Your LLM App with User Feedback Using Langtrace

Dylan Zuber

Software Engineer

Jul 25, 2024

In this post, we'll explore how you can enhance your LLM applications by collecting and analyzing user feedback using Langtrace. We’ll walk you through importing a React component for thumbs up and thumbs down feedback and making an API request to send this feedback to Langtrace Cloud. Let's dive in!

Example Usage

Passing User Feedback

Collecting user feedback is essential for measuring the performance and accuracy of your LLM applications. Langtrace SDK enables you to pass user feedback as scores, providing valuable insights into user satisfaction.

Types of Feedback

  • Binary feedback (thumbs up/down)

  • Numeric ratings (e.g., 1-5 stars)

  • Textual feedback

Implementation Guide

Here's a step-by-step guide on how to implement user feedback collection in your Next.js project using a React component.

Step 1: Wrap your LLM function call with Langtrace

First, wrap your LLM API call with Langtrace.withLangTraceRootSpan() to receive the spanId and traceId needed to send feedback. In this example, I have created an OpenAI function call in a NextJS route.

import { FOOD_DATA_PROMPT } from "@/lib/constants";
import * as Langtrace from "@langtrase/typescript-sdk";
import { NextRequest, NextResponse } from "next/server";
import * as openai from "openai";
import { OpenAI } from "openai";
Langtrace.init({
  api_key: "LANGTRACE_API_KEY",
  instrumentations: {
    openai,
  },
});

export async function POST(req: NextRequest) {
  const formData = await req.formData();
  const file = formData.get("file");

  let response = null;
  let spanId = null;
  let traceId = null;

  if (file && file instanceof File) {
    const client = new OpenAI({
      apiKey: "OPENAI_API_KEY",
    });
    const arrayBuffer = await file.arrayBuffer();
    const buffer = Buffer.from(arrayBuffer);
    const base64 = buffer.toString("base64");

    await Langtrace.withLangTraceRootSpan(async (spanId, traceId) => {
      response = await client.chat.completions.create({
        model: "gpt-4-turbo",
        messages: [
          {
            role: "user",
            content: [
              { type: "text", text: FOOD_DATA_PROMPT },
              {
                type: "image_url",
                image_url: {
                  url: `data:image/jpeg;base64,${base64}`,
                },
              },
            ],
          },
        ],
      });
      return { response, spanId, traceId };
    });
  }

  const data = response!.choices[0].message.content!;
  return NextResponse.json({ response: data, spanId, traceId });
}

Step 2: Setting Up the API Route

Next, set up an API route in your NextJS project to handle the feedback submission. This is the API route where you can send the user feedback to Langtrace Cloud.

import * as Langtrace from "@langtrase/typescript-sdk";
import { NextRequest, NextResponse } from "next/server";

export async function POST(req: NextRequest) {
  try {
    const { userId, userScore, traceId, spanId } = await req.json();

    await Langtrace.sendUserFeedback({
      userId: userId,
      userScore: userScore,
      traceId: traceId,
      spanId: spanId,
    });

    return NextResponse.json(
      { message: "feedback sent successfully" },
      { status: 200 }
    );
  } catch (error) {
    console.log("error", error);
    return NextResponse.json(
      {
        error: "Something went wrong while sending feedback :-(",
      },
      { status: 404 }
    );
  }
}

Step 3: Creating the React Component

Finally, create a React component to collect user feedback using thumbs up and thumbs down icons. In this example, when the user clicks on the icon, the /api/feedback route we just created will be called with the necessary data to successfully store feedback in Langtrace!

import { ThumbsDown, ThumbsUp } from "lucide-react";
import { useState } from "react";

export default function Feedback() {
  const [selected, setSelected] = useState("");

  const handleThumbsClick = async (score: number) => {
    setSelected(score === 1 ? "up" : "down");
    try {
      await fetch("/api/feedback", {
        method: "POST",
        headers: {
          "Content-Type": "application/json",
        },
        body: JSON.stringify({
          userId: "<user-id>",
          userScore: score,
          traceId: "<trace-id>",
          spanId: "<span-id>",
        }),
      });
    } catch (error) {
      console.error("Error sending feedback:", error);
    }
  };

  return (
    <div className="flex">
      <div className="px-4">
        <button
          onClick={() => handleThumbsClick(1)}
          className={`${selected === "up" ? "text-black" : "text-gray-400"}`}
        >
          <ThumbsUp />
        </button>
      </div>
      <div className="px-4">
        <button
          onClick={() => handleThumbsClick(-1)}
          className={`${selected === "down" ? "text-black" : "text-gray-400"}`}
        >
          <ThumbsDown />
        </button>
      </div>
    </div>
  );
}

Example Result

Component:

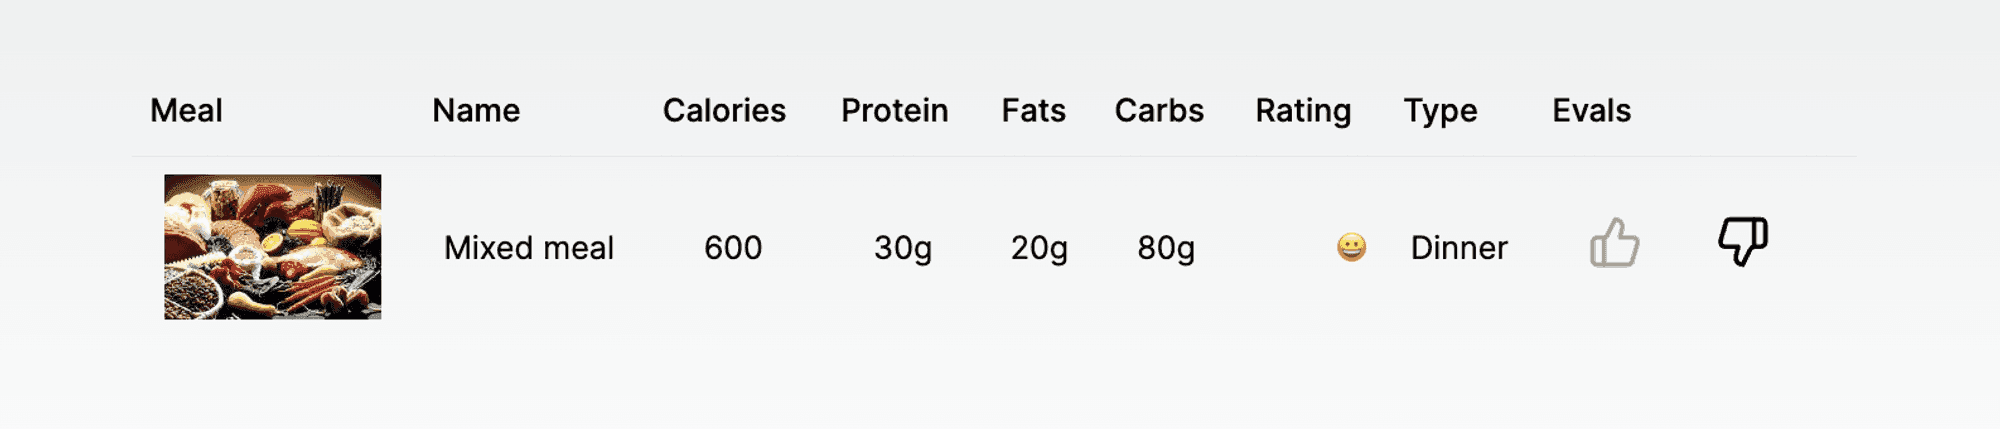
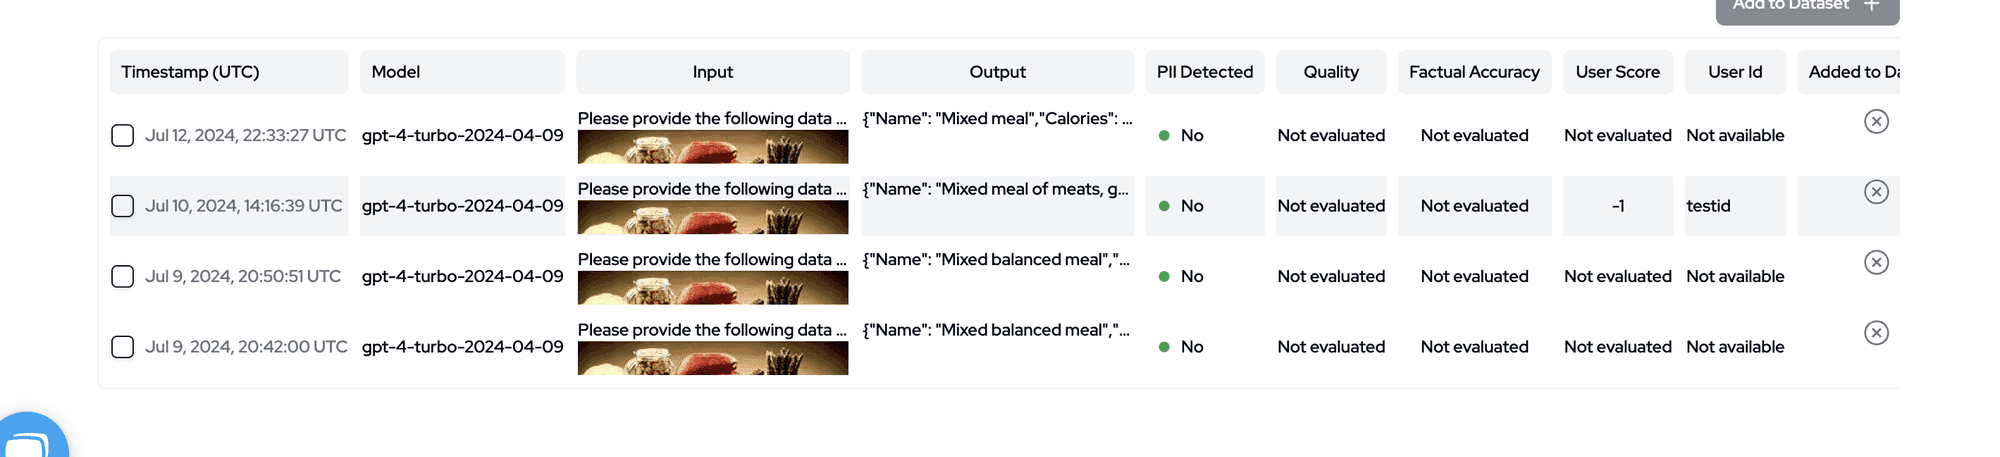
Feedback in Langtrace:

Best Practices

  • Keep feedback collection simple and non-intrusive: Ensure that the feedback process is quick and easy for users.

  • Clearly communicate how feedback will be used: Let users know that their feedback helps improve the application.

  • Act on feedback to improve your application: Regularly analyze feedback and implement changes based on user suggestions.

  • Regularly analyze feedback trends: Use Langtrace Dashboard to identify patterns and trends in user feedback.

Conclusion

By following this guide, you can efficiently collect user feedback in your LLM applications using Langtrace. If you want a more detailed look into how this works, checkout our example Github Repo: Evaluate-LLM, Implementing user feedback mechanisms not only helps you understand user satisfaction but also provides valuable data to enhance your application's performance and accuracy. Start collecting feedback today and make your LLM applications better with Langtrace!

Join our Discord community for the latest updates and engage with fellow enthusiasts. Should you encounter any challenges or queries, don’t hesitate to reach out — we’re here to assist. Start your journey of enhanced observability and optimization with Langtrace today.

Ready to try Langtrace?

Try out the Langtrace SDK with just 2 lines of code.

Ready to deploy?

Try out the Langtrace SDK with just 2 lines of code.

Want to learn more?

Check out our documentation to learn more about how langtrace works

Join the Community

Check out our Discord community to ask questions and meet customers